Monday, October 15, 2012

A quinoa bowl fit for Fall


The cold weather has arrived which means it's time to turn on the oven and enjoy warm grains and Fall crops. I've talked about my love of roasted brussels sprouts before, so you can imagine how tickled pink I was to see them at the grocery store last week. I roasted up a batch in garlic and lemon juice (recipe here), stir-fried some zucchini, red pepper, onion, and chickpeas and nestled it all into a bed of quinoa. I topped the dish with a generous squeeze of lime juice and a pinch of salt and pepper. The best part was enjoying it all over again for lunch the next day :)

Wishing you tasty meals and happy days,
Rebecca

Monday, October 8, 2012

Pancakes...or something like it.


Happy Thanksgiving y'all! On this beautiful morning I woke up craving pancakes. This never happens and as a result I admittedly have no idea how to make pancakes. Instead of following a recipe I got a little carried away. One thing lead to another, I swapped this for that and that for this, added a dash here and a dash there and all of a sudden I had something that somewhat resembled a pancake...kind of.  It doesn't exactly look like a pancake and doesn't really taste like a pancake either. These cakes are hearty with a lot of texture and while they are thick they aren't what you would call fluffy. Bottom line is that they tasted good and are chocked full of nutritious ingredients.

A note on nutrition: the oats, whole wheat flour, flaxseed and apple bump up the fibre content of this recipe. The ground flaxseed and almonds provide heart healthy fats.

Recipe:
Makes: about 12 small cakes

Ingredients: 
Large flake oats, 1/2 cup
Almond milk (you can use any type of milk you like), 1/2 cup + 1/4 cup
Whole wheat flour, 1/4 cup
Ground flaxseed, 2 Tbsp
Warm water, 3 Tbsp
Apple, diced, 1
Almonds, 1/4 cup
Coconut, 1 heaping Tbsp
Maple syrup, 2 Tbsp
Cinnamon, 1/2 tsp
Baking powder, 1 tsp

Directions:
1. Soak oats in 1/2 cup of almond milk. Ideally you should let them soak for 20 minutes. I'm a tad impatient so I let mine soak for 10 minutes and the earth did not shatter, so that should do.
2. While the oats are soaking, cut an apple into small pieces and cook over medium heat until soft(ish). Depending on the type of pan you use, you may need to add a small amount of oil to the apples to avoiding sticking.
3. Combine the ground flaxseed and water and let sit for about 5 minutes.
4. Place almonds in a bag, take a hammer, and smash the almonds into small pieces (my favourite part!). When the apples are almost finished cooking, add smashed almonds and coconut to the pan.  Remove from heat once the coconut and nuts are toasted and fragrant (just a couple of minutes).
5. Mix flour into the oat mixture.
6. Combine all ingredients into the oat and flour mixture.
7. On medium heat, add a tablespoon of oil to your pan and drop a heaping tablespoon of the mixture onto the pan. Cook until golden brown on both sides, flipping the pancake after about two minutes.
8. Drizzle with maple syrup and enjoy!


Wishing you happy days, tasty meals, and a delightful Thanksgiving,
Rebecca 


Monday, September 17, 2012

Happy dessert

Get ready. Cause I'm about to make you happy.

You know when you want a really delicious dessert but you don't want to leave the house and you don't want to put in any effort and you'd prefer to eat guilt free? Well here it is folks: Apple Maple Coconut Cinnamon Oat-y goodness (that's the official name).


I think I know what's going through your mind...  how good could an apple dessert really be? No sign of pie crust, no ice cream in sight, not even a drizzle of caramel or chocolate. I understand, but it's time you trust me. It tastes a lot like apple crisp but its faster to make, mess-free, and most importantly has a fraction of the sugar.  Plus, it's apple season! Apples are particularly delicious these days so you may as well take advantage :) 

Recipe: 
Serves: 1  (It could be shared into two small portions, but once you take a bite you probably won't want to share. Plan accordingly). 

Ingredients: 
Apple 
Maple Syrup 
Oil/margarine/butter 
Unsweetened shredded coconut 
Cinnamon 
Large flake oats 

Directions:
Preheat oven to 350F. 
Cut an apple into medium sized chunks. 
Drizzle with oil and maple syrup. 
Sprinkle with coconut, cinnamon, and oats. 
Pop in the oven for about 20 minutes or until apples are nice and soft. You may want to give it a little stir half way through. 


Wishing you tasty meals and happy days,
Rebecca

Friday, August 17, 2012

Friday Smiles

Happy Friday! I'm back from vacation and have so many pictures of delicious eats to share and hopefully some tasty recipes too! Until I get back into the groove of real life (it's been a week, but I'm still not there), I leave you with a good old fashion food pun. 

Wishing you a happy weekend, 
Rebecca


Wednesday, August 1, 2012

Home again home again, jiggity jig

It's summer vacation time!  I'm off to enjoy endless ocean, fresh salty air, and the best people on the planet. This year's destination: home.

Wishing you happy days,
Rebecca

Fogo, Newfoundland
Photo Credit: Newfoundland and Labrador Tourism

St. John's, Newfoundland
Photo credit: Lyndon Keating

Humpback Whale
Photo Credit: Rolf Hicker Photography 

Monday, July 30, 2012

If I had my little way I'd eat peaches every day.

One day I told my friend that peaches were my favourite fruit. Her reaction was unsettling and far from what I expected. She passionately disagreed. Her argument: bananas are much more versatile. Well, yes. The versatility of banana will not be argued. Bananas certainly have their role - they scream winter, warm the soul and satisfy hunger. However, I find something so boring about how they are just so available. Twelve months of the year, a beautiful green/yellow/brown (whatever you fancy) banana is right there. 

I wait 10 months of the year for peach season. Anxiously and with anticipation. I day dream of their refreshing, juicy taste and their invigorating aroma. A peach energizes me with thoughts of summer, sunshine, and blissfully frolicking through an unkempt meadow (which by the way, never actually happens).  This charming video from Roost sings ode to the peach and quite elegantly captures the pureness and happiness of this precious little fruit (as in, I bruise like a peach, kind of precious).


video from: www.roostblog.com

Please do take a visit over to Roost to enjoy the stunning photography, charming videos and delicious recipes. Your eyes will be forever grateful. 

And just to prove that peaches can rival bananas in terms of versatility, here are some recipes that may please your palate:

PB&J Makeover
Peach Tart
Peach Mango Popsicles 
Spinach Salad with Grilled Peaches and Gorgonzola
Grilled Pork Chops with Ginger Peach Chutney
Peach and Tomato Gazpacho with Cucumber Yogurt 
Peach and Pecan Oat Crumble Bars 
Frozen Peach Bellini 
Peach Crisp 

Wishing you fragrant, juicy peaches and happy days,
Rebecca

Saturday, July 21, 2012

Too hot to cook

Growing up my grandmother's famous excuse for not cooking was that it was simply "too hot to cook." Now, I didn't grow up on a tropical island, houses didn't normally have air conditioning, and some years it seemed like it never topped 25 degrees celcius. However, it was a great excuse to avoid the stove and simply have tea and toast for breakfast, lunch, and dinner (because apparently it is never too hot for tea and toast). When I'm feeling a little lazy, I dance to my dear nanny's words that it is simply too hot to cook.

However, in all honesty, this month I may as well be living on a tropical island because Toronto has been HOT. Real hot. Too hot to cook hot.  Which fits in perfectly with the Recipe ReDux Challenge this month: Beat the Summer Heat with No Cook Meals. 


Cashew Lemon Creamy Salad Dressing

Makes: about 1 cup of dressing

Recipe: 
3/4 cup cashews
1/2 cup water
1/2 lemon
1 clove garlic
2 basil leaves
1 tbsp fresh cilantro 
1 tsp coconut (optional)
1/2 tbsp Maple Syrup (you can also use honey or agave)

Directions: 
1. Throw cashews and juice from half a lemon (I actually added some more in after, so maybe a little more than half a lemon, depending on how much you like lemon) in a food processor. Process until cashews become smooth. To help the process add water 1 tablespoon at a time. Keep processing. It took about 10 minutes and 1/2 cup of water (8 Tbsp) for my dressing to get the desired consistency. 
2. Add garlic, herbs, coconut, and syrup and process until well blended. 
3. Take a taste test - is it sweet enough? sour enough? garlic-y enough? Take the time to play with the recipe a little bit and add more of whatever it needs. 
4. Once your dressing tastes delicious and is the desired consistency add it to your favourite salad. 

My salad had arugula, corn, match stick carrots, and raisins. I topped it off with smashed cashew pieces.


Before you leave be sure to check out some of the amazing recipes posted by other Recipe ReDuxers.

Wishing you tasty meals and happy days,
Rebecca


Wednesday, July 18, 2012

Brilliant Ideas

Last night I was chatting with friends about the phone book and how ridiculous it will be in another twenty ten years when we tell kids that we used to have a book with EVERYONE'S phone number in it. I can hear myself now, "when I was a young girl, they used to print a very thick book, every year, that had everyone's phone  number and address in it. The book was delivered to your house, free of charge. Some houses would even get two". The problem is, this doesn't really teach anyone a lesson, ya know what I mean? At least when my parents tell me "when I was a kid we had to walk to school in snowstorms with plastic bags over our shoes....up hill both ways" I know they are actually telling me to stop complaining because I don't know how easy I have it. But to be honest, I really don't think there is a lesson to be learned about having to use a phone book instead of the internet...well maybe patience. Yes, let's go with patience. 

Anyway, that story has little to do with the point of this post. The point is that I love the internet. Some people have such great ideas and I am so happy that people post their brilliance on the internet so that I can reap the benefits of their creative minds. 

Here are some awesome things that I found on the internet this week: 

When it comes to fresh herbs, I'm down. These are so beautifully grown and stored.
Well done, Country Living, well done.


Pineapple flowers. Pure genius. Click here and here


I need a tree in my kitchen asap. Click here if you agree. 


True commitment to a tropical themed party. Click here 


Clearly I am obsessed with home-made pizza. Check out the recipe for Garden Hummus Pizza, yum!


Wishing you tasty meals, happy days, and fantastic internet finds, 
Rebecca

Sunday, July 15, 2012

Summer Salads


Oh summer days, I love ya, I really do. 

But I've been doing a horrible, horrible job making meals this month. Like, really bad. I've had many nights where supper consisted of hummus, carrots, crackers and a glass of wine. I just can't get myself to spend time in the kitchen. I mean, there has been heat waves (which as a Newfoundlander I am totally unprepared for), extended hours of sunlight, patios screaming my name, sunny parks, and week night outings. 

But really, it's time to add a little pizzaz to my meals. A girl can't do this forever. 

Due to my aversion to the kitchen these days I have been frequenting a cafe near my work for lunch. They have a fabulous sweet potato lentil salad. As I was chowing down the other day I thought "what's wrong with me?! I can make this!". And so I did (with a change or two). It was wonderful and more importantly, quick!

Arugula, roasted sweet potato, lentils, avocado, red onion, and goat cheese - seriously people, this salad is good. 

It's raining right now, so it's the perfect time to spend 20 minutes cooking sweet potato and lentils. I'll pop them in the fridge and use them for a no-cook salad throughout the week. 

Ingredients 
It's a salad - use as much or as little as you like. You are the boss. 
Arugula 
Roasted Sweet Potato 
Cooked green lentils 
Goat cheese
Avocado
Red Onion 

Additions that I am for sure going to try: 
Sunflower seeds
Granola (the original has this, yum!) 
Peaches
Raisins
Herbs - Basil, Dill, Cilantro 

The dressing:
I keep it simple - juice from a fresh lemon and a drizzle of olive oil.

Directions: 
1. Cut the sweet potato into half moon slices. Toss  in olive oil. Bake at 450 F for 15 - 20 minutes. 
2. Rinse a cup of green lentils in cold water. Bring to a boil with three cups of water in a large pot for 15-20 minutes, or until lentils are no longer hard. 
3. Chop all other ingredients and toss together together. Drizzle with lemon and olive oil. 


Wishing you happy days, tasty meals and lots of sunshine!
Rebecca

Friday, June 29, 2012

Friends with barbecues


Ohhh barbecue season, I love you. I really, really do. I love your taste, your smell, your assumption that we will eat outside. I even love chasing after flying napkins, licking mustard off my hand, and awkwardly eating on the grass/curb/wobbly chair.

My apartment building doesn't allow barbecues (I know, super lame) so I am trying to lure my barbecue-owning friends into inviting me over for some fun and tasty times this summer. I promise I will bring some delicious eats to throw on the grill. This week I brought drunken tofu (see picture above), marinated for 20 hours in beer, garlic, ginger, and barbecue sauce. It was delicious. Get the recipe here.

Here's hoping we all get to enjoy a little barbecue on this fine Canada Day weekend!
Rebecca

Tuesday, June 26, 2012

Refried Black Beans


As you've probably guessed (or perhaps you know because I've written it one thousand times on this blog), I'm a big fan of beans. They are my number one protein preference and I'm on a mission to show the world just how versatile they really are.

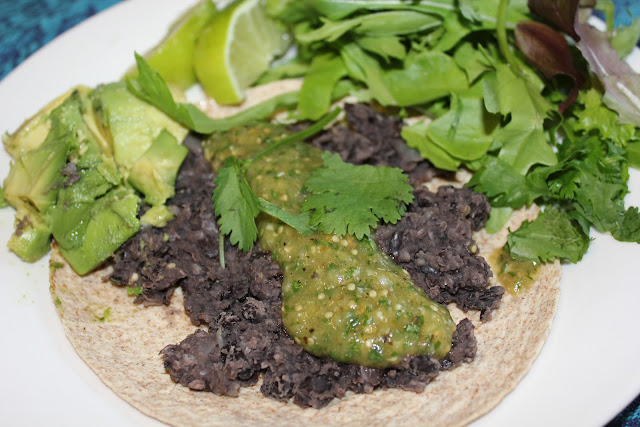
Refried beans  are delicious, but when you buy them in a can they are generally packed with sodium, fat, and extra calories. I decided to make my own and it really wasn't that hard. I added them to a whole grain tortilla, topped with salsa verde, a squeeze of lime, and some avocado. They would also be delicious in a breakfast burrito or piled on top of nachos. 


Recipe: Refried black beans

Black Beans, cooked - 2 cups 
Onion, chopped - 1/4 cup 
Garlic, minced - 2 cloves 
Cumin - 1/2 tsp 
Serrano pepper, roasted and chopped - 1 
Olive oil - 1/2 tbsp 
Water - 2-4 cups 

Directions: 
Add olive oil to a hot pan and fry onion and serrano pepper (you can also use jalapeno). Add garlic and cumin stir together and add beans to the pan (about 1/2 cup at a time).
Smash/smoosh/squash the beans with your spoon or potato masher, adding a little bit of water to moisten the consistency*. Continue to add the beans, smashing along the way. I added about 1/4 cup of water at a time until I came up with my desired consistency. This will be different for everyone, so stop when you feel you have reached the right level of moisture and smoothness. If you've added too much, fear not, just cook for a little while longer and the water will (hopefully) evaporate. Go ahead and let the beans start to get crispy and crunchy before stirring them.
*You can also blend your beans in a food processor and then fry on a pan. I decided to kick it old school and do it with a spoon and potato masher.....cutting down on dish washing time played a key role in this decision.

Wishing you tasty meals and happy days,
Rebecca

Saturday, June 2, 2012

Summer Bouquet

picture taken from pinterest.com

Adding berries to a summer bouquet, in my opinion, is simply charming. 

Happy weekend, 
Rebecca


Wednesday, May 30, 2012

Salsa Verde


Do you recognize the fruit in the picture above? They're tomatillos and they are beautiful. I have a billion pictures of them 'cause they are just so darn pretty.


This is the first time I've cooked with tomatillos - so here's a one-sentence-fast-fact on them: tomatillos look similar to green tomatoes, are related to the cape gooseberry, and provide the tart flavour in Mexican green sauces.

I've been meaning to make Salsa Verde forever, so I'm happy to say that I finally got my booty in gear and picked up some tomatillos at the grocery store. Tip: despite their similar look to tomatoes I found them in the exotic fruit section rather than the tomato section.


"What will I do with Salsa Verde?" you ask. The answer is simple: anything you want.  Dip with rice crackers or tortilla chips, add to a burrito, enchilada, or taco, use as a burger topping, pour over rice, or serve with scrambled eggs and/or refried beans. Any other ideas? 

This guilt-free dish is packed with nothing but vitamins and minerals. It's low in calories, and when you make it yourself, contains very little sodium (you can even leave out the salt completely!).


Recipe: Salsa Verde 

Ingredients:
Tomatillos - 1 pound (this was about 7 tomatillos)
Serrano (or jalapeño) pepper - 1
Garlic, clove - 2
Cilantro, fresh - 1/2 cup
Onion, diced - 1/4 cup
Lime juice - 2 tsp (10 mL)
Salt - pinch (optional)

Directions: 
1. Preheat oven broiler.
2. Remove papery husk from tomatillos, wash, and cut in half.
3. Place tomatillo halves, Serrano pepper, and garlic cloves (unpeeled) on a baking sheet (option: line baking sheet with parchment paper for easy clean up). 
4. Broil for 15-20 minutes, until tomatillos and peppers are roasted and slightly charred on both sides. Turn over half way through.
5. Once cooled, remove the skin of the Serrano pepper and garlic.
6.  Throw all ingredients into a food processor and pulse until well blended. Salsa verde tends to thicken as it cools, so blend more for a thinner consistency.

Prepare....

Roast....


Blend, blend, blend.....


Eat and enjoy! 

Wishing you tasty meals and happy days,
Rebecca

Monday, May 21, 2012

Sea what you've been missing


Recipe Reduxers have been given the Sea What You've Been Missing challenge this month in hopes of expanding our culinary skills to include nutritious treasures from the sea. With that in mind I got my sea vegetable hat on and decided to skip the japanese restaurant and make homemade sushi.


Sushi is one of my favourite foods however I almost always fill my sushi cravings at Japanese restaurants since it takes a bit of time and patience to make at home (but hey, all good things in life take time and patience, right?). After making these vegetable sushi rolls I have decided that a make-your-own-sushi party is in my near future (regardless of the rice-smooshed-onto-floor mess that I will inevitably face at the end of the night).

The great thing about sushi is that you can add whatever fillings suit your fancy, your budget, and your refrigerator contents.  I used sautéed and roasted veggies but you can also try smoked salmon, raw sushi-grade fish, shrimp, or mango!

Recipe: Asparagus Portabella Sushi Roll


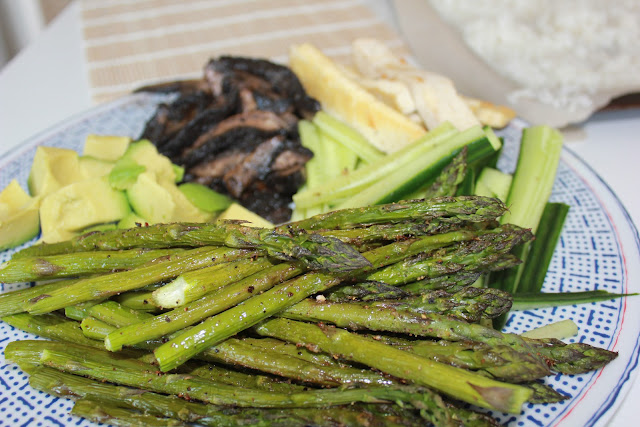
First, decide what you want to fill your sushi with. I chose oven roasted garlic asparagus, sautéed portabella mushrooms, sautéed tofu, cucumbers, and avocado. These can be hot or cold (I prefer cold). 


Next, cook your rice. Make sure you use sushi rice since it has a sticky texture that keeps everything in place. Add uncooked rice to water and bring to a boil (see package instructions for ratio of rice:water). Reduce heat and cover for 15 minutes (do not uncover during this time). Remove rice from heat and let sit, covered, for ten minutes. Meanwhile, mix 1/4 cup rice vinegar, 4 teaspoons of sugar, and 3/4 teaspoon of salt. Pour  mixture over rice in small batches and fold rice until covered. Spread rice on a baking pan and let cool. 

And of course, the feature of this post - Nori! Nori is a thin, dried, seaweed sheet. One sheet of nori contains 1 gram of fibre, 6% Daily Value of Vitamin A, 4% of Vitamin C, and 3%  of Vitamin D. 


Place plastic wrap on top of the bamboo mat and place the nori on top of the plastic wrap. Place the shiny side of the nori down with the dull side facing up.  


Spread a layer of rice over the dull side of the nori.  If the rice is sticking to your hands just run them under cold water. 


Place sushi filling across the middle of the nori. Don't overstuff  - unless, of course, you have a really big mouth :) 


Roll the nori with just the plastic and then finish it off by wrapping the bamboo mat around the roll. To better see how this works check out this instructional video.


With a sharp knife cut the roll into slices. Serve with wasabi, pickled ginger, and soy sauce. 
When possible, choose low sodium soy sauce, or limit the amount you use. Soy sauce has a high amount of sodium which in excess can increase your risk of high blood pressure, dehydrate you, and in my case, cause a serious case of swollen eye lids! 


Check out the recipe redux entries below to find some more recipes that feature small fish (like sardines, anchovies, and smelt) and sea vegetables (like seaweed and kelp). 

Wishing you tasty meals and happy days, 
Rebecca


Sunday, May 13, 2012

M-M-M-Mochi

Do you like trying new foods? I sure do.  So last weekend while at The Big Carrot with a friend we stumbled across Mochi. Not knowing what it was, we read the package - 'the rice cake u bake", Ingredients: brown rice and water.  Hmm...cake with two ingredients - clearly we had to see what it was all about. 

According to Wikipedia,  Mochi is a traditional food for the Japanese New Year, made out of glutinous rice pounded into a paste and moulded into shape.


It's simple, you unwrap the package and break it into squares or chunks. You then broil it in the oven for 5 to 10 minutes and ....


Voila! Cute, puffed up squares.


These look really yummy don't they? Well, hold your horses. Mochi is certainly interesting, but it has a really bizarre texture. The outside is crispy while the inside is super chewy and doughy. There is no sugar or seasoning in it so it's quite bland and absolutely needs something to accompany it. My solution was to drizzle with maple syrup and cinnamon, which did the trick, but you can also go savoury.


Did I enjoy the mochi? Yep.
Am I glad I didn't serve it at a dinner party? Yep.
Will I buy it again? Probably not.
Do I think it can be transformed into a tasty healthy snack? Oh yes. I'd love to hear about your mochi success stories!


Wishing you mochi success, 
Rebecca 

Friday, May 4, 2012

See the beauty


Beautiful moments this week include:

Sunshine
Bike rides
Far away friends sending texts that make me smile big
Thunder storms and warm rain 
Funny workmates 
Documentaries that make your heart smile  
Week night adventures 
Hanging out with high school kids for a day
Hugs
A nature escape in a bustling city 
Silly people
Endless options


Wishing you a weekend full of beautiful moments, 
Rebecca

Wednesday, May 2, 2012

Hey there, I remember you.


Oh boy. It's been a while. Too long, actually.
The last month has been a busy one, filled with a surprise visit home (thanks to my gorgeous bffs), my mama in town (working on a fabulous show),  an addiction to the Hunger Games trilogy (I'm dying to find out how it ends), a nasty cold (that's finally gone), swing dancing my booty off, and many other wonderful things. While my social life is doing well, it's seriously time to add some sizzle to my meals.

I had some leftover fresh pasta that needed to be cooked so I decided to pair it with pan seared scallops, caramelized onions and mushrooms, topped with fresh parmesan cheese and basil. Yum.

Recipe: Pan-Seared Scallops and Spaghettini 
Ingredients: 
Spaghettini
Scallops
White onion, sliced
Mushrooms, sliced
Habanero Pepper, sliced
Pepper
Oil/Margarine/Butter
Basil, chopped
Garlic, minced

Directions:

I've decided not to put in measurements because they really don't matter much in this recipe. Make this to your liking, perhaps you want to go heavy on the onion and light on the habanero  - do what feels right.
  1. Add sliced onions and mushrooms to a oiled (or buttered) pan and let them cook until they caramelize. Add habanero pepper and lots of garlic. 
  2. While this is happening lay scallops on a paper towel and place another layer or two of paper towel on top of the scallops. This will draw the moisture out of the scallops and will allow you to sear the scallops and get a nice brown colour.
  3. Once scallops are dry, season them as desired (I kept it simple with ground pepper and a tiny amount of salt). 
  4. In another pan, heat oil or butter. When pan is hot add the scallops and cook for two minutes. Turn over and cook for another two minutes. 
  5. While scallops are cooking, boil pasta until cooked. 
  6. Add some fresh basil and parmesan before serving. 

Wishing you a happy, healthy month of May,
Rebecca